

Have you been searching for the best sensitivity for free fire one tap headshot? If you’re nodding your head right now, do well to read this post to the end. You know that feeling when you’re face-to-face with an enemy, you tap the fire button expecting a clean headshot, but your crosshair flies past their head and you end up spraying at their feet?
Yeah, I’ve been there too. And let me tell you something most of the time, it’s not your aim that’s bad. It’s your sensitivity.
How good you are at landing one-tap headshots depends heavily on how well your sensitivity is tuned to your hand movement and your device.
So today, I’m going to break down exactly how to find and set the best sensitivity for Free Fire one-tap headshots. Not just random numbers I’m copying from some pro player, but a practical system you can use to find what works for you. Let’s get into it.
Best Sensitivity for Free Fire One Tap Headshot
Number One: Understand What Each Sensitivity Actually Does
Before you start tweaking numbers, you need to know what you’re actually changing. Free Fire has several sensitivity sliders, and they control different things.
General sensitivity controls how fast your camera moves when you’re not aiming down sights. This is for looting, looking around, and close-range hip-fire movement.
Red Dot sensitivity controls your aim when you’re using the red dot sight or holographic sight — this is where most of your one-tap headshots will happen. Then you have 2x scope, 4x scope, and sniper scope sensitivity for longer range fights.
Here’s the thing most people don’t realize: these sensitivities don’t work in isolation.
If your general sensitivity is too high, even a perfect red dot setting will feel off because your baseline muscle memory is shaky. Think of general sensitivity as your foundation. If the foundation is wrong, everything else wobbles.
Also, stop copying pro players’ sensitivity settings blindly.
They’re using different devices, different screen sizes, different thumb grips, and some even use gyroscope while others don’t. Their perfect sensitivity could be completely wrong for you. Use their settings as a starting point if you want, but always calibrate for yourself.
Number Two: The Starting Point — Base Settings That Actually Work
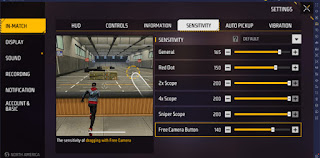
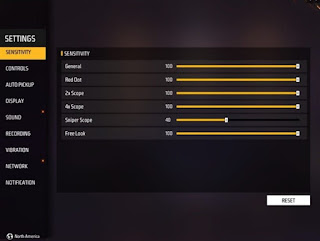
Let me give you a solid starting point. These aren’t random numbers — they’re based on what works for most players who prioritize one-tap precision over wild spraying.
Set your General sensitivity to 95-100. You need it high enough to do quick 180-degree turns when someone shoots you from behind, but not so high that you can’t control it.
Red Dot sensitivity should be around 85-95. This is your bread and butter for one-taps. It needs to be fast enough to flick to a head, but slow enough that you don’t overshoot.
For 2x scope, go with 75-85. For 4x scope, try 60-70. And for AWM or sniper scope, keep it at 50-60. The reason scopes need lower sensitivity is simple: at longer ranges, a tiny movement on your screen equals a huge movement in the game world.
If your sniper sensitivity is too high, you’ll never land those long-range headshots because the crosshair jumps around too much.
Now, here’s the important part: these numbers are just your starting line. Don’t treat them as final. You’re going to adjust them based on how they actually feel in the training ground.
Number Three: The Training Room Method — Finding YOUR Perfect Sensitivity
This is where the magic happens. Go to the training ground right now. Yes, right now. Don’t just read this and forget it.
First, find a wall and stand about 10 meters away. Aim at a single point on the wall — maybe a crack or a mark. Now, try to keep your crosshair on that point while moving left and right.
If your crosshair keeps overshooting the point when you stop moving, your sensitivity is too high. Lower it by 2 or 3 points. If you feel like you’re fighting to reach the point and your thumb is straining, it’s too low. Raise it by 2 or 3 points.
Next, find the moving target bots. Try to track their head smoothly as they run. Your crosshair should stay glued to their head without you constantly correcting left and right.
If you’re making tiny jittery corrections, your sensitivity is slightly off. Adjust by 1 or 2 points until the tracking feels smooth — almost like the crosshair is an extension of your thumb.
Do this for each scope type. Spend at least 5 minutes per scope. I know it sounds boring, but this is how you build consistency. Most players skip this step and wonder why their aim is inconsistent. Don’t be that player.
Number Four: Crosshair Placement — The Secret Nobody Talks About
Here’s a truth that will instantly improve your headshot rate: sensitivity only matters if your crosshair is already near the head when you see the enemy.
If your crosshair is at chest level and you have to drag up every time, even perfect sensitivity won’t save you.
Always keep your crosshair at head level. Always. When you’re clearing a building, when you’re peeking around a rock, when you’re running through open ground — keep it where the enemy’s head will be. Most players in Free Fire are standing or crouching at roughly the same height. Learn where that head level is on your screen and make it a habit.
Pre-aim common angles before you even peek them. If you know someone is behind that wall, already have your crosshair at head height near the edge of the wall.
When you peek, you only need to move horizontally, not vertically. The less distance your crosshair has to travel, the more likely you are to land that one-tap.
And learn the drag-and-stop technique. Don’t flick wildly and hope you hit.
Drag your crosshair toward the head smoothly, stop for a split second to confirm it’s on target, then tap. It sounds slower, but it’s actually faster than missing and having to readjust. One clean shot beats three missed shots every time.
Number Five: Your HUD Layout Matters More Than You Think
Sensitivity isn’t just about the numbers in the settings menu. Your HUD layout directly affects how fast you can aim and fire.
Make your fire button large enough that you can tap it without looking, but not so large that it blocks your view of the enemy. Position it where your thumb naturally rests. If you have to stretch your thumb to reach the fire button, you’re adding delay to your one-tap.
Your ADS button should be separate and easily accessible. Some players use the left side of the screen for ADS and the right for firing — this works great for one-taps because you can aim and fire simultaneously without moving the same thumb back and forth.
Also, check your phone’s touch sensitivity settings. Some phones have a “gaming mode” or “touch sensitivity boost” in the settings. Turn it on. It makes your screen register your thumb movements faster, which pairs beautifully with the right in-game sensitivity.
If your phone has a high refresh rate of 90Hz or 120Hz use it. The game will feel smoother, and tracking moving targets becomes noticeably easier. It’s not just a visual thing; it genuinely helps your aim.
Number Six: Common Mistakes That Destroy Your One-Tap Potential
Let me save you some frustration by pointing out the mistakes I see over and over again.
- one: sensitivity too high. Players think high sensitivity makes them faster, so they crank everything to 150. Then they wonder why every headshot attempt overshoots. Your thumb is not a precision instrument at that speed. Keep it controlled.
- two: sensitivity too low. Some players go too far in the opposite direction and set everything to 30. Sure, they can land shots on stationary targets, but the moment an enemy jumps or strafes, they can’t track them. You need enough speed to follow movement.
- three: changing settings every day. I get it — you had a bad match and you think your sensitivity is wrong. So you change it. Then you have another bad match and change it again. Stop. Muscle memory needs time. Pick a sensitivity and stick with it for at least two weeks of regular play. Your consistency will improve dramatically.
- four: ignoring gyroscope. I’m not saying you must use gyroscope— plenty of thumb-only players are amazing. But if you struggle with vertical control, try adding a small amount of gyroscope sensitivity for vertical adjustments. It takes pressure off your thumb and can make headshots more consistent.
Number Seven: Training Drills That Actually Build Muscle Memory
Sensitivity means nothing without muscle memory. Here are three drills I want you to do for 15 minutes before you start playing ranked matches.
Drill one: Static headshots. In the training ground, stand at various distances from the target dummies and practice tapping only the head. Don’t spray. One tap, reset, one tap, reset. Do this until you can hit 8 out of 10 headshots without thinking.
Drill two: Moving target tracking. Follow the running bots with your crosshair on their head for as long as possible. Don’t fire — just track. This teaches your hand how much to move at your current sensitivity.
Drill three: The peek-and-tap. Set up a custom room with a friend. Take turns peeking from behind cover and trying to one-tap each other. This builds real combat muscle memory because you’re dealing with actual human movement and unpredictability.
Do these drills daily for two weeks. I promise you, your one-tap consistency will improve even if you never change your sensitivity again. But when you combine good drills with properly tuned sensitivity? That’s when you become dangerous.
Number Eight: Advanced Tips for Different Weapons and Situations
Not every weapon behaves the same, and your sensitivity should account for that.
For SMGs like MP40, you can afford slightly higher sensitivity because you’re fighting at close range and enemies move fast. For ARs like AK or M4A1, stick to your calibrated red dot setting — this is where one-taps matter most. For snipers, lower sensitivity is your friend, but make sure you can still do quick scope adjustments.
Attachments matter too. If you put a stock on your weapon that reduces recoil, you might find your sensitivity feels slightly different because the gun settles faster. It’s subtle, but after enough playtime, you’ll notice it.
Also, learn to stay calm. I know that sounds like generic advice, but here’s the practical side: when you panic, your thumb presses harder and moves faster. That extra force throws off your sensitivity muscle memory. Train yourself to keep a light touch on the screen even in intense moments. Breathe. Tap. Don’t smash.
And finally, if your phone is lagging or heating up, your touch response becomes inconsistent. No sensitivity setting can fix hardware lag. Play on a cooled phone with good battery, or lower your graphics settings to keep the frame rate stable.
That’s All for Today
If you’ve read this far, you now understand that one-tap headshots aren’t about having god-like reflexes. They’re about having the right sensitivity, the right crosshair placement, and the discipline to train your muscle memory.
Don’t just copy the numbers I gave you and call it a day. Go to the training ground. Test them. Adjust them. Make them yours. Stick with your final setting for at least two weeks, do the drills, and watch your headshot rate climb.
If you found this guide helpful, share it with a friend who keeps complaining about their aim. And if you want more Free Fire tips — from close-range movement to late-game positioning — let me know in the comments. I’ll keep making detailed guides like this one.
Now stop reading and go land some headshots.